2.4. Working with the desktop client
By default, the desktop client automatically synchronizes all changes at the same time as the Unibox Server.
Contact
Albert-Einstein-Straße 22
18059 Rostock
Josephin Tschakste
Tel.: +49 381 498-5347
unibox.support(at)uni-rostock.de
2.4.1. Notification window
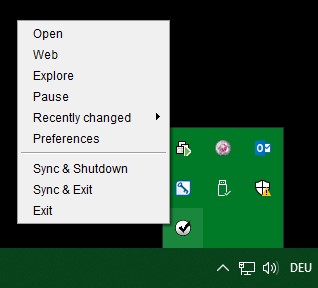
In the notification window (System Tray) you will find an icon of the Unibox Client. This icon shows the current status of the synchronization and you have a right mouse click on the icon a menu.
By right clicking on the symbol, you have the following options:
- open the desktop client
- Open your folder in the web interface
- Open the Unibox folder on your local hard drive
- Pause/Stop all synchronization processes
- Look at the latest changes
- Open the settings of the client
- Let the client finish the synchronization and then shut down the PC automatically
- Stop the client from synchronizing and then terminate the client automatically
- Stop the client
When you start the client, you are prompted to log in. All you have to do is enter your username and password. After starting, you will see the overall status in the notification window:


The circle with the check mark means the Unibox is fully synchonized.
The circle with the hourglass means that the Unibox is waiting to synchrnoize your folders, e.g. when the client is waiting for a connection to the internet.
The circle with the rotation means that the Unibox is currently being synchronized.
The circle with the two bars (pause sign) means that the synchronization has been stopped.
The circle with the exclamation mark means that the Unibox requires your attention. Expenses reasons are that you are not yet logged in, your hard disk is full, you have lost permissions to a folder, or your storage quota has exceeded.
2.4.2. Settings in the Desktop-Client
The desktop client can used in two different modes. By default, it will installed in “Beginner Mode”. However, the “expert mode” can selected by the user.
Beginner Mode
After installation, the client runs in entry-level mode by default. In this mode, only the synchronization status, the synchronized folders and the default settings can viewed.
he following functions are possible in entry-level mode:
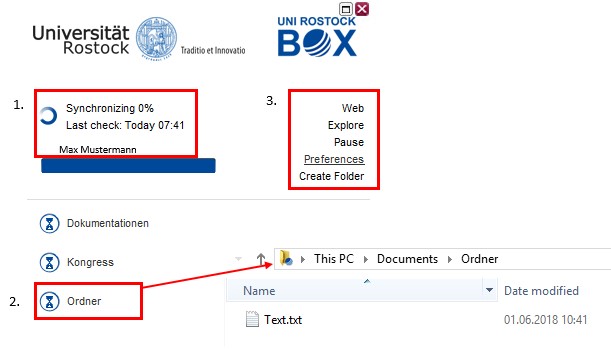
- The upper part of the client shows the synchronization status, the time stamp of the last synchronization check, and the name of the logged-in account.
- By clicking on a folder from the client, it is called up in the local file manager. There, local data can be copied, created, edited or deleted.
- There are serveral buttons on the top right corner:
3.1. Web
This opens the website of the Unibox in the Internet browser and it is possible for you to work directly on the web.
3.2. Explore
It opens the file manager on your PC and it is possible to edit, create and delete files.
3.3. Pause
The synchronization will pause until your start it again. During this time, no data is synchronized from the server/web or other clients to you PC and no files from your PC to the server/ web or other clients.
3.4.Preferences
This opens the settings menu. Further information on the settings will follow.
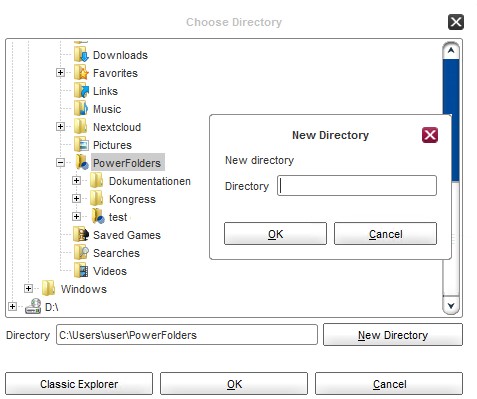
3.5. Create Folder
It is possible for you to create further folders via the client interface on your
PC, which are also synchronized. You can create the folder via the wizard or
with the classic file manager.
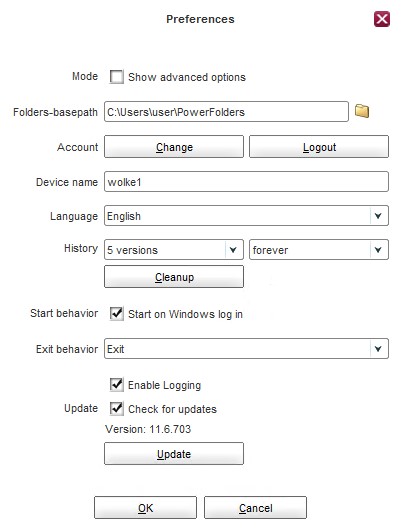
4. In the settings, you will find minimalistic settings.
It is possible for you to change the default path for the folders. You can also log out of the client or switch accounts if multiple users are working with one client. Below this, you will see the name of your PC and you can set the language for the client. It is also possible for you to set how many backup versions and how long to keep your folders and their contained files. Underneath it is possible to specify that the client start with Windows startup. Furthermore, you can set the closing behavior of the client. Here you select whether the client should be terminated or minimized when clicking on the Red Cross. If it is minimized, it will continue running in the background and continue to synchronize your files. Finally, it is possible for you to turn on the logging, which we highly recommend, should it come to an error case and check on new updates on or off. If you deactivate this option, you have the option at any time to update the client manually via the “Update” button.
Expert mode
After installation, the client runs in entry-level mode by default. In order to switch to the „expert mode“ the advanced mode has to be activated in the settings. Then the client has to restarted.
The following functions are possible in „expert mode“:
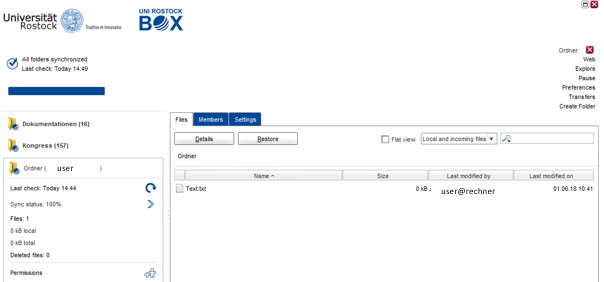
- The upper part of the client shows the synchronization status, the time stamp of the last synchronization check, and the name of the logged-in account.
- Click on the folder icon to call it up in the local file manager. There, local data can be copied, created, edited or deleted.
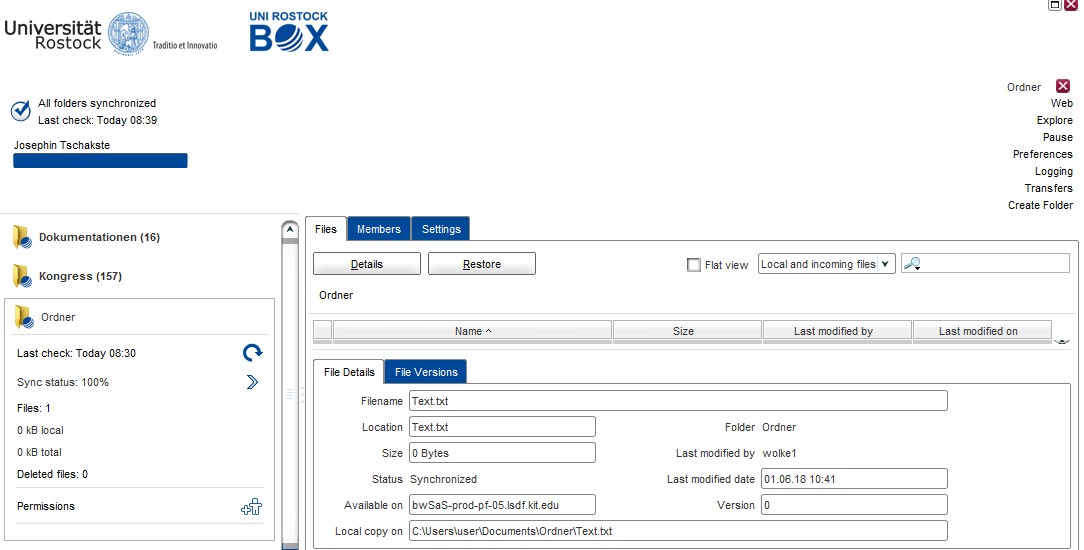
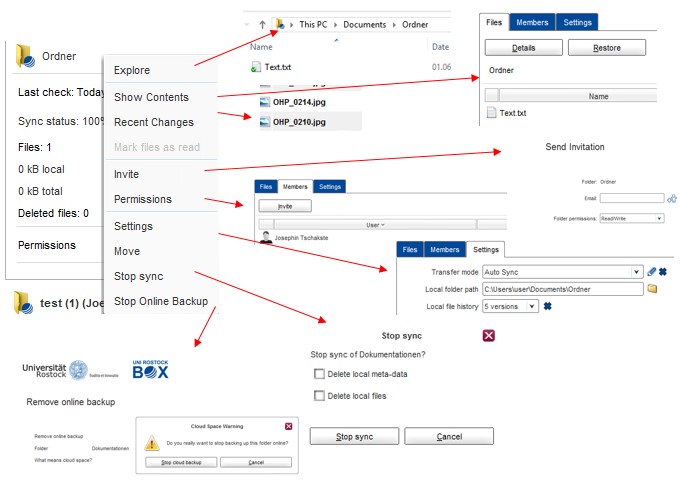
If you click on a folder name in the client, the display expands and the contents of the folder are displayed. In addition, the details can displayed per file. There you can look at the size of the file, the location, when and by which PC the file was last edited, the versions of the file and the synchronization status.
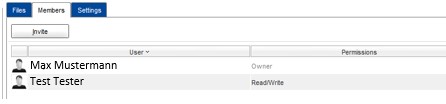
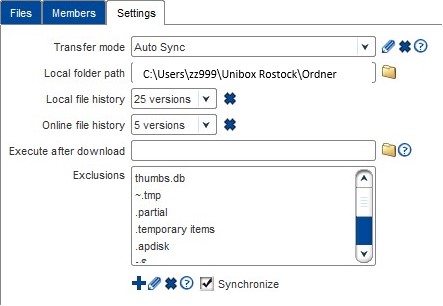
There are also two more tabs „Members“ and „Settings“. Under “Members” the members can be displayed with their permissions of the folder and further users can be invited via the client.
Settings for the folder can made under „Settings“.
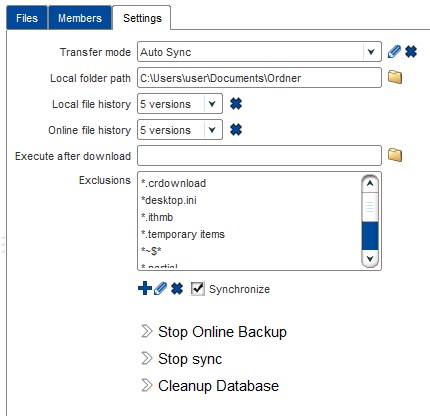

Transmission modes can selected, you can decide whether the data should be synchronized automatically, manually, once a day, when sharing/sending etc. Furthermore, a separate transfer mode can be created with its own rules via the pen-icon.
A separate name can assigned for this transfer mode. For easier configuration, the rules can copied and adjusted from another transmission mode. Furthermore, it can selected whether new and changed files as well as deleted files should be synchronized. You can also set the interval or hour and day to check for
changed or new files.
Furthermore, the local folder path can changed in the settings, as well as the file flow can be adjusted. Files with certain endings can excluded from synchronization. There are already given some endings, which can be edited or deleted and added new endings.
Via “Stop Online Backup” the folder on the server/web can be deleted.
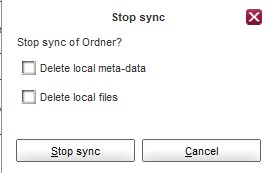
Via „Stop sync“ the synchronization for the folder is stopped. Furthermore, it can decided whether the folder should be deleted locally.


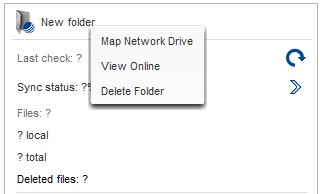
3. On the left side you can see more information in the extended view for the respective folders. It will be displayes when the last time the folder was synchronized. The synchronization can be started again via the arrow . The Sync Status indicates if the synchronization process for this folder is complete. Furthermore, the number of files, the largest and the deleted files can be displayed. “Permissions” open the tab “Members” to manage the rights of the folder.
4. Several buttons can be found on the upper right edge
- Web
This opens the website of the Unibox in the internet browser and it is possible for you to work directly on the web. - Explore
It opens the file manager on you PC and it is possible to edit, create and delete files. - Pause
The synchronization will pause until you start it again. During this time, no data is synchronized from the server / web or other clients to you PC and no files from your PC to the server / web or other clients. - Preferences
This opens the settings menu. Further information on the settings will follow. - Logging
Current LOG-Inscriptions are displayed in the client and from here, it is possible to open the folder in which the log-files are stored on the PC. - Transfers
In the transfer, overview, the download and upload transfers can be viewed up to the last 30 days. The files, the synchronization status, the size, the folder in which the file is located and from which client or server the file was synchronized are displayed.
7. Create Folder
It is possible for you to create further folders via the client
interface on your PC, which are also synchronized. You
can create the folder via the wizard or with the classis file
manager.
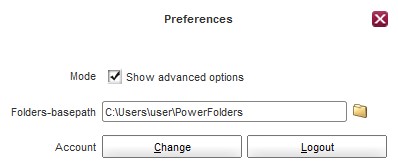
5. In the settings, you have different settings. These are divided into several tabs.
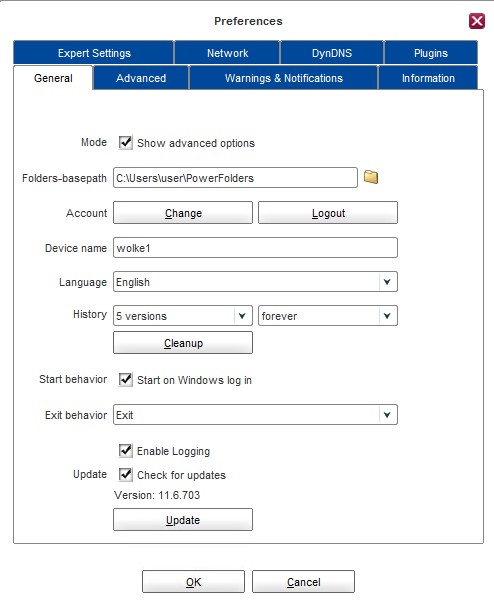
- General
It is possible to change the default path for the folder. Next, you can unsubscribe from the customer or change the account, more users will work with a client. Below this you will see the name of your PC and you can set the language for the client.
It is also possible for you to set how many backup versions and how long to keep your folders and their contained files.
Undermeath it is possible to specify that the client start with Window startup. Furthermore, you can set the closing behavior of the client. Here you select whether the client should be terminated or minimized when clicking on the red cross. If it is minimized, it will continue running in the background and continue to synchronize your files. Finally, it is possible for you to turn on the logging, which we highly recommend, should It come to an error case and check on new updates on or off. If you deactivate this option, you have the option at any time to update the client manually via the “Update” button. - Advanced
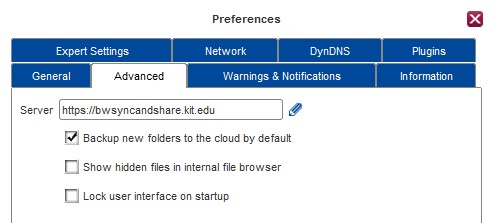
The server URL specifies the server you are connecting to. This should not changed. Furthermore, you can check the following options:- By default, backup new folders to the cloud
- Show hidden files in the internal file browser
- Lock user interface at startup
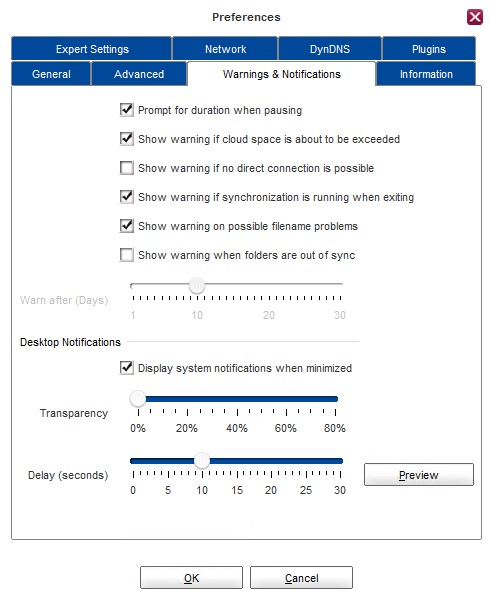
- Warnings & Notification
The following options can set by ticking:- Show duration of pause
- Show alerts when the cloud space is exceeded
- Display warnings if no direct connection is possible
- Display warnings if the synchronization is still running when the client exits
- Show warnings about possible file name problems
- Display warnings when the folder is out of sync
If this option is activated, a period for the warning can be set.
Weiterhin können Einstellungen zur Desktop Benachrichtigungen gemacht werden. Ist die Option zur Dektopbenachrichtigung aktiviert kann die Transparenz der Fensterfarbe, sowie die Verzögerung in Sekunden angegeben werden.
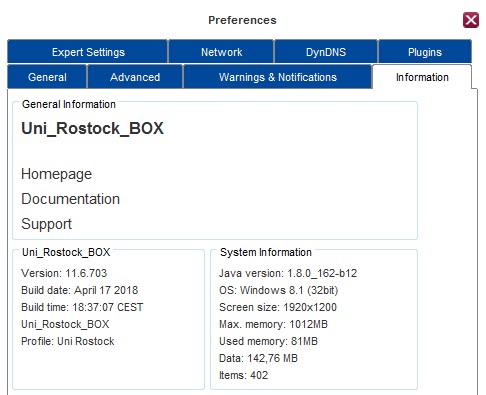
- Information
In the information, you will find details about the client version, as well as system information. Furthermore, you will find links to the web interface (homepage) and this documentation.
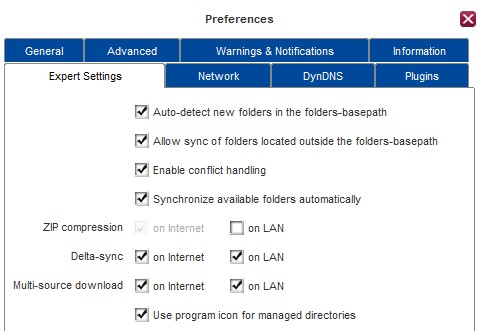
- Expert Settings
In the expert settings, you can set or remove further options.- automatically detect new folders in the folder base path
- Allows synchronization of folders outside of the base path
- Enable conflict handling
- Automatically sync available folders
- Enable ZIP-Compression
- Delta-Sync in the Internet and/or in the LAN (synchronization of computers with each other in their own network)
- Multi-source Download on the Internet and/or LAN (Download from multiple sources (server, clients)
- use the managed directory program icon
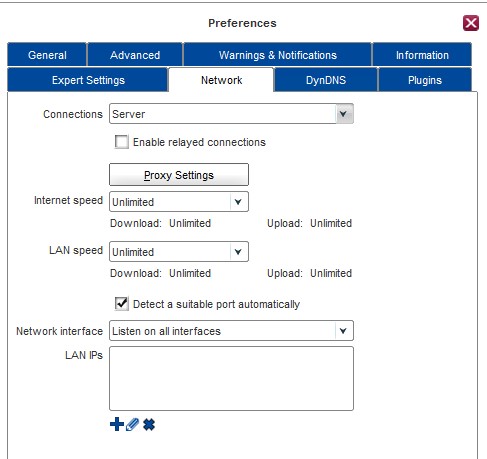
- Network
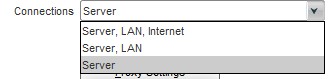
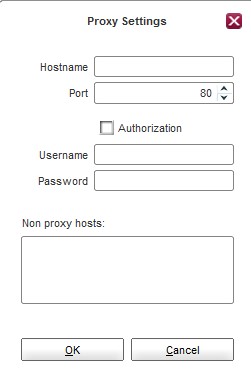
Here you can configure network settings. In the first step, it is possible to specify the connections. It specifies whether the data should transmitted via the server, server and LAN or server, LAN and internet. We only recommend servers. Furthermore, direct connections to other PCs can enabled, which throttled internet and LAN speed (if you only have a slow internet connection). The option “Automatically determine a suitable port” can be enabled/disabled. Under Network Interfaces, all interfaces or specific interfaces can selected. Furthermore, certain LAN IPs can be specified, edited and deleted. If necessary, the proxy server and port as well as an authentication with user name and password can specified in the proxy settings.
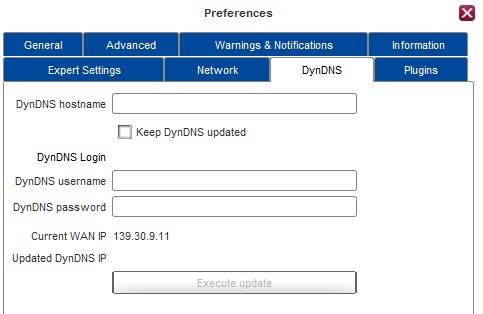
- DynDNS
DynDNS is a paid service that allows a dynamic IP address to act as a static IP address. If you have configured a DynDNS account on the client in the past, using DynDNS improves your connectivity. This shortend the time the client goes online. This makes it easy for your device to found either on the PowerFolder network or on a privately invited device.
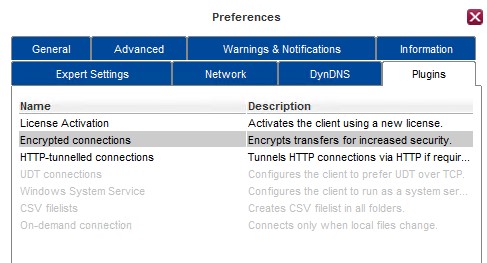
- Plugins
Plugins show the activated and deactivated plugins. These can be configured and de/activated here.
2.4.3. Download and Upload files
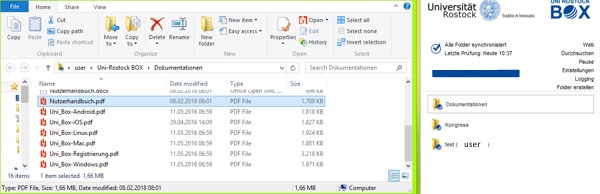
When the client is first started, the program creates a new folder namen “Unibox Rostock” just below the user profile (default data path). It is, like any other, a folder on the disk. Here, the clien automatically detects when new files are filed or existing files are changed and synchronizes them. If you click on a folder in the client again this directly in the file manager of the PC opened and you can change the files in it or add new ones.
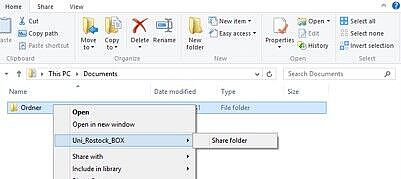
If another folder is also to synchronized outside the "Unibox Rostock" folder, this can be done via the context menu. Open the context menu on the folder to be shared in the file manager with a right mouse click and select "Unibox Rostock"> "Share folder".
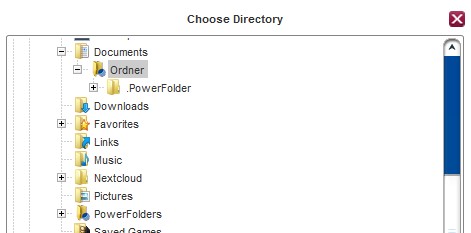
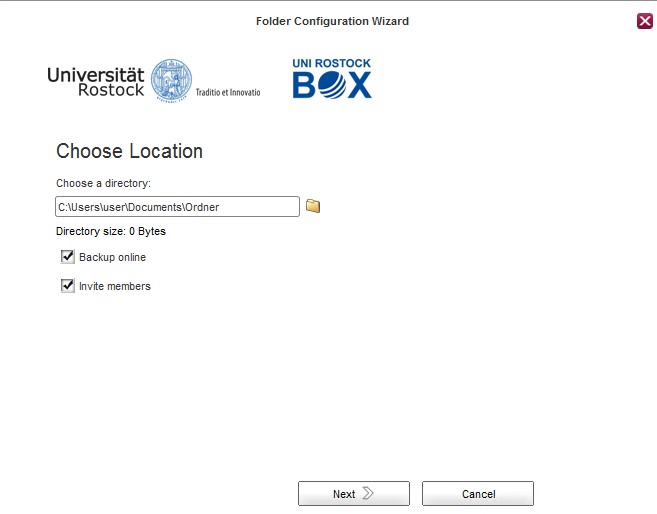
This opens a configuration wizard for this folder. Here you can choose a directory, which is already done in this case and if necessary set two hooks: "Backup online" and "Invite Members". This allows you to specify that the folder should moved to the server and whether you already want to invite users to this folder.
Click "Next" to configure the folder for sharing
If you have selected "Invite Members", a window will follow to send the invitations. Here you can add the users via their e-mail address and assign rights for these users.
Then the invitations are sent to the invited users and the setup for the folder is complete.
Then the folder appears in the client and can managed. For example, other users can invited to this folder, settings can be made.

2.4.4. Working with the context menu
The following steps worked in expert mode.
Context menu of the Client
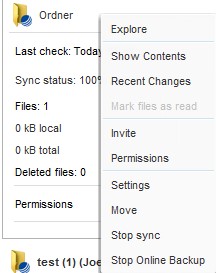
Via the context menu of the order in the client it is possible to jump faster to certain points and to carry out further actions.
With Explore, the folder can opened in the local file manager.
Show Contents changes to the content overview of the folder in the client.
Recent Changes displays new or changed files in the folder.
With Mark files as read, all files are marked as read, so the folder and the files it contains are no longer displayed as new or edited.
It is possible to jump directly to the invitation wizard via Invite and other members to the folder.
Permissions jumps to the tab “Members” and displays the current members and their permissions for the folder.
With Settings you jump directly to the folder settings.
With the help of „Move“ it is possible to move a folder on the PC without undoing the synchronization. If you no longer want to synchronize and / or delete a folder, this is done via Stop sync. If you delete a folder, it will remain in the client as a “gray” and empty folder. It can then be permanently deleted from the client via “Delete Folder” (the folder has already been deleted locally). It is also possible to stop the online backup via “Stop Online Backup”. Then the files are not synced to the server and backed up.
Context menu in Windows Explorer
Using the context menu of the folder in the Explorer, it is possible to interact with the folders and files. In the context menu of the Windows Explorer there is a point Unibox Rostock over which you can locally perform further actions of an already synchronized folder
- You can open the folder in the web browser (Open file location in web), to work there with the folder.
- You can add more users to the folder and grant them permissions (Share folder).
- You can move the folder (Move folder).
- Synchronization can stopped for this folder (Stop sync).
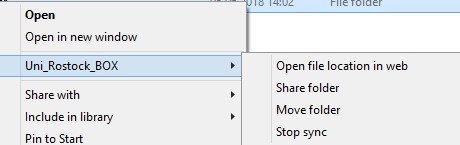
All these functions work in the same way as in the client, since the corresponding wizards are also opened here.
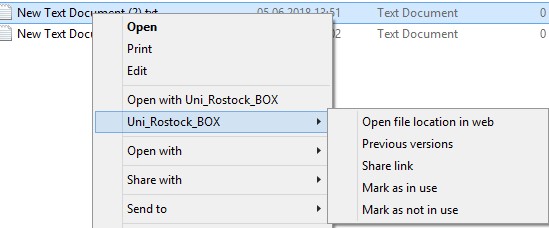
In a synchronized folder, you have additional options for the files contained in it via the context menu of the explorer.
- The file can opened in the webbrowser (Open with Unibox Rostock) and edited there in the online editor.
- The folder containing the file can opened in the web browser (Open file location in web).
- Using the wizard of the client, previous versions can be restored (Previous Version)
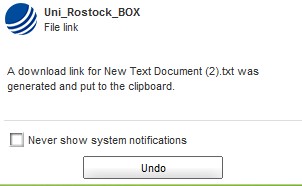
- A download link (Share link) can created for the file. The client then receives a notification that a link has been created for the file and copied to the clipboard. At the same time it is possible to undo this.
- The can be marked as usedt (Mark as in use). This will indicate to all other users who can also access the files of the folder that the file is currently being edited / used and cannot be modified by them.
- If you have finished editing the file and want to give the other users of the folder back to the file, you can mark the file as unused (Mark as not in use). This will allow other users to re-access the file and modify if it the right has been granted.
2.4.5. Move a folder
The location of the folder in the local system can changed using the desktop client. This preserves the correct synchronization mapping between the local folder and folder on the Unibox server. The folder can moved via the context menu in the client or in the local file manager. In the context menu choose Move.
You can only select the Move folder option for a folder that has been previously enabled for synchronization.
The folder to be moved (source folder) be marked in the directory. Select the destination folder. Please note that the contents of the folder will be moved, not the folder itself. If the destination folder is not empty, the contents of the original folder will be overwritten after a warning message.
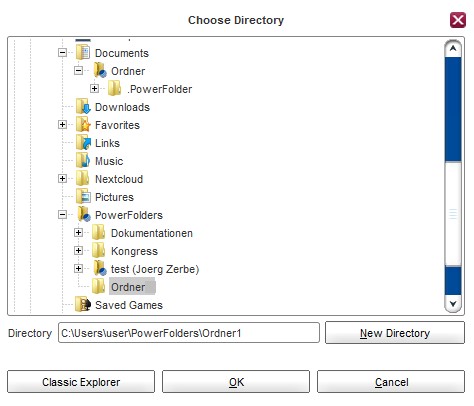
Create a new directory / folder with the name of the source folder in the destination folder.
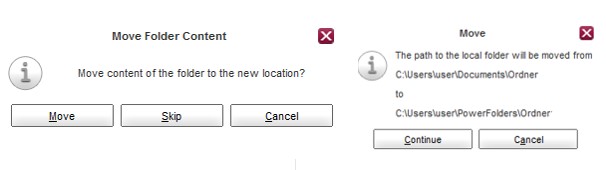

Click Move, and then confirm the new location with Continue.
The synchronization is moved with the folder. The destination folder is not included in the synchronization. If you also want to synchronize the level of the target folder, release it for synchronization using the context menu.
2.4.6. Clear
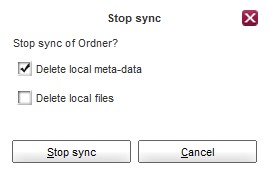
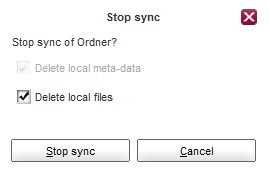
To delete a folder, it is recommended to stop the synchronization first.
Stop synchronizing a folder, you have two options.
- Delete local metadata
Deleting local metadata will leave the folder intact. Only the connection between the server and the local computer is interrupted. Both on the server and on the local PC, the folder remains. Changes are no longer transferred. After the synchronization is stopped, the folder will be displayed without the congestion icon. - Delete local files
Deleting local files will delete the folder locally. In addition to the connection abort, the local folder is deleted. The folder and the files it contains will also be deleted on the server.
2.4.7. Restore
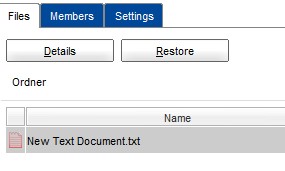
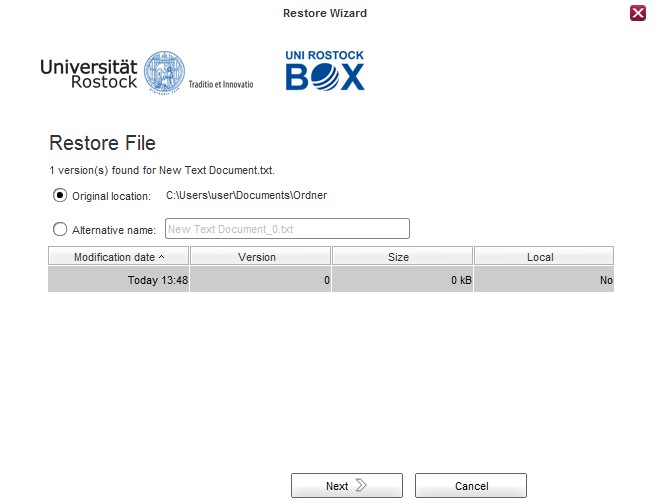
In entry-level mode, deleted files can restored from the local Recycle Bin, depending on the setting of the desktop. In expert mode, it is also possible to restore files from the history file. The Unibox stores deleted and old files in a file history. The storage space for previous versions is at the expense of your storage volume. (You can set the number of versions yourself). There are two ways to recover files in the folder.
In the folder information on the left there is the item Deleted files. Click on it to see the deleted file and use Restore to see the file history of the file.
Deleted files and previous versions of this file are displayed here. There are also two recovery options. The option original location overwrites the visible version with the restored one. The alternative name option creates an additional file in the folder with the different name.
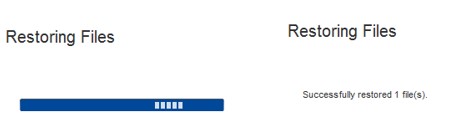
Select the desired version and restore. Afterwards the file will be in the original path and will be displayed again in the client.
Only files (one or more at a time) can recovered. Unfortunately, this is not possible for folders.
Restore via Windows Explorer
Another possibility is the recovery via Windows Explorer.
To do this, open Windows Explorer and change to the directory where the Desktop Client synchronizes your data.
C:\Users\Username\Unibox Rostock\
This directory will show all your synced folders. Now switch to the main folder where a file is to be restored.
C:\Users\Username\Unibox Rostock\Mainfolder1
Then click in the address bar of the Windows Explorer and specify \.PowerFolder\archive behind the path.
C:\Users\Username\Unibox Rostock\Mainfolder1\.PowerFolder\archive
Here you will see all the files and subfolder structures of the folder. Here you will find deleted documents and previous versions of your documents.
Select the desired file and copy it back to your synchronized directory.
2.4.8. Enable delete protection
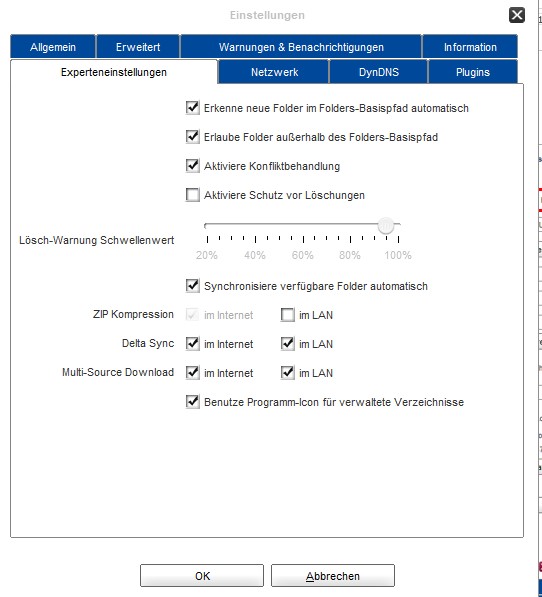

If a folder on a device is accidentally deleted, there is a risk that the deletion will be forwarded to other members of the folder. If you have buld-erase protection enabled, the client prevents forwarding the deletion to other members of the folder.
Activate the delete protection:
- Click Settings
- Click Expert Settings
- Activate the checkboc “Activate protection against deletions”
- The default value for the deletion-warning threshold is 95%.
2.4.9. Exclude documents and folders from synchronization
To exclude documents and folders for synchronization, you must use the client in advanced mode.
Select the main folder for which documents or subfolders are to be excluded from synchronization and go to the Settings tab.
There you will find the "Exclude list" in which you can add further exclusion rules via the plus symbol.
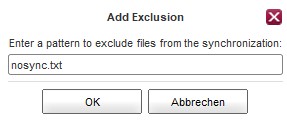
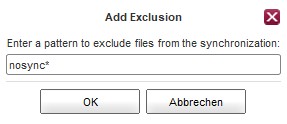
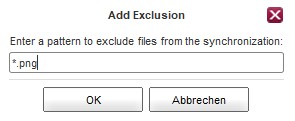
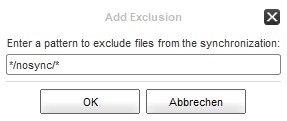
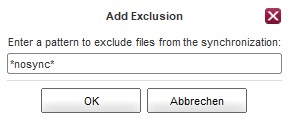
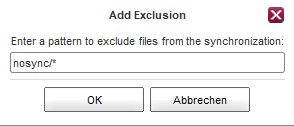
Examples of exclusion patterns:
To exclude the nosync.txt file, enter the following in the line: nosync.txt
To exclude all files containing the word nosync, enter the following in the line: nosync *
To exclude all files in the main folder only, which contain the extension .png, type the following into the line: * .png
To exclude all files in all subfolders named nosync, enter the following in the line: * / nosync / *
To exclude all files that start with nosync, enter the following in the line: * nosync *
To exclude all files in all subfolders that contain the extension .png, enter the following in the line: * / *. Png

To exclude all files in the subfolder nosync, enter the following in the line: nosync / *
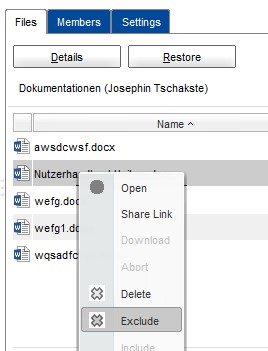
Another way to exclude files or subfolders from synchronization is via the context menu.
Select the main folder in your desktop client and select the subfolder or file you want to exclude and right-click on the file.
This will give you the context menu. Select "Exclude" to exclude the file or subfolder from synchronization.